传统的hexo-admin使用deploy是调用以下语句,在本地生成并部署到服务器
1
2
3
hexo clean
但是我的博客使用双仓库模式,即建立blog和blog-deploy两个仓库。
blog仓库用于储存文章、图片等源码信息。blog-deploy用于发布博客。即hexo d的目标仓库后来发现我现在创建的blog-deploy是多余的,因为在服务器自动部署后,直接移动/复制到blog-deploy目录即可,不用产生额外的提交。
只需要直接提交代码到服务器,然后由服务器执行部署代码即可。创建push.bat,代码如下
1
2
3
git add . 1
对于部分linux和osx等系统,可能不兼容bat文件,可能需要修改为*.sh
在hexo-admin点击Deploy就会自动执部署脚本。
编辑_config.yml增加以下内容。
1 2 3 admin :'push.bat'
关键技术是使用githook。
1
2
3
4
5
6
7
8
9
10
11
12
13
14
15
16
17
18
19
<?php "pull" => true ,"script" => [ "echo now Ready hexo clean" ,"hexo clean" ,"echo now Ready hexo generate" ,"hexo g" ,"echo \\rm -rf ..../blog-deploy/*" ,"\\rm -rf ../blog-deploy/*" ,"echo markBuildTime" ,"date +'%Y/%m/%d %H:%M:%S'>../blog-deploy/build.txt" ,"echo now Ready Copy to deploy" ,"\\cp -rf public/* ../blog-deploy/" " && " , $blog["script" ]);
由于存在其他系统变量,上述代码可能无法执行,仅供参考。
前面已经在服务器拉去时使用"date +'%Y/%m/%d %H:%M:%S'>../blog-deploy/build.txt",生成构建时间,现在想把该时间显到页面中/source/about/index.md文件,在文件最后面增加
1 2 3 4 5 6 7 8 9 10 11 12 13 14 15 16 17 18 19 20 21 22 23 24 25 26 27 28 29 30 31 32 33 34 35 36 <script type ="text/javascript" > function addLoadEvent (func) var oldonload = window .onload; if (typeof window .onload != 'function' ) { window .onload = func; } else { window .onload = function ( addLoadEvent( () => function getBuildTime ( path="../build.txt" ) $.get ( path, (e)=>{ console .log("获得生成时间成功" ) let build = document .createElement("div" ); let hr = document .createElement("hr" ); let buildTime = document .createElement("span" ); let TextNode = document .createTextNode("This Website Was Generated On " ); $(".article-body" ).append( hr, build ) }).error(e => console .log("获得生成时间失败" ) let hr = document .createElement("hr" ); let build = document .createElement("div" ); let TextNode = document .createTextNode("Failed To Get Build Time." ); $(".article-body" ).append( hr, build ) </script >
由于显示文章内容时,全局函数还没加载,因此新增addLoadEvent执行队列。
这里使用的是hexo-admin@2.3.0
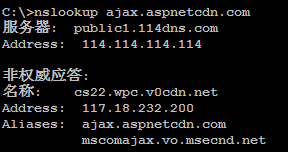
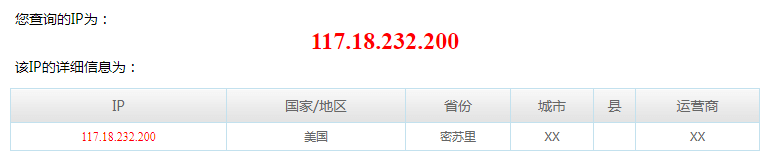
hexo-admin在引入jquery时默认使用的是//ajax.aspnetcdn.com的CDN。nslookup 查询到该域名指向117.18.232.200 淘宝IP数据库 查询到该IP地址指向美国密苏里,在国内环境可能不稳定。
./node_modules/hexo-admin/www/index.html第10行的ajax.aspnetcdn.com更改为国内的CDN。我这里是直接把该行注释,并增加百度智能云提供的CDN。
1 2 <script src ="//apps.bdimg.com/libs/jquery/1.9.0/jquery.min.js" > </script >
在windows的环境使用hexo-admin,可能在插入图片时会产生错误。如直接粘贴图片时,会在编辑区域生成以下内容,右侧的区域也无法正常查看。
1 
解决方案:./node_modules/hexo-admin/api.js的第388和400行。
1 2 3 "/" + filename
修改以后,图片可以正常插入,格式为
1 
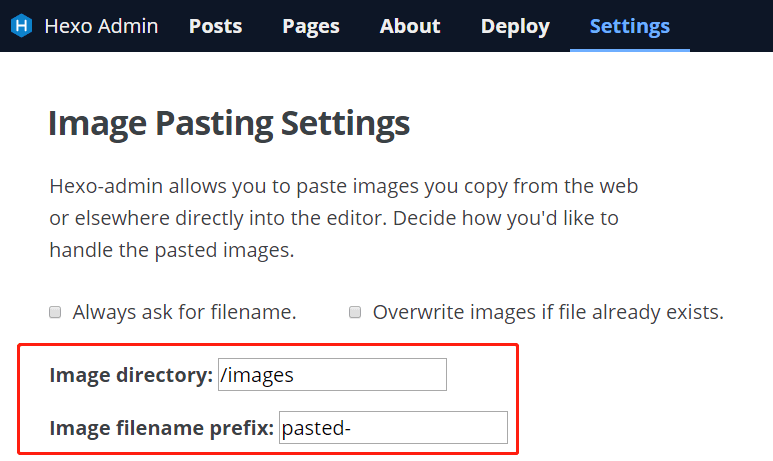
如果想修改默认目录和前缀,可以到Hexo-admin的Setting中修改:
现在插入图片有可能由于写入等原因,图片可能没有马上展示。继续编辑文章或者保存刷新即可正常显示图片,不影响写作。
使用tinify
1 2 3 4 5 6 7 8 9 10 11 12 13 14 15 16 17 18 19 20 21 22 23 import tinifyimport os;"xxx" "../../source/images-origin/" ;'.jpg' ,'.png' ];for item in os.listdir(currentDir):if os.path.isfile(fulldirct):'doing:' +fulldirct) if os.path.splitext(item)[1 ] in supportImgType:'done:' +fulldirct)
默认情况下hexo-admin的posts编辑实时预览与pure的主题不完全一致,需要对hexo-admin的主题进行修改。
对/node_modules/hexo-admin/www/index.html进行修改,在任意位置增加以下CSS。具体CSS根据文章页面的加载内容进行hack。
1 2 3 4 <link rel ="stylesheet" href ="/css/style.css" > <link rel ="stylesheet" href ="/css/theme/common.css" > <link rel ="stylesheet" href ="/css/theme/monokai-hook.css" > <link rel ="stylesheet" href ="/css/theme/monokai.css" >
目前存在bug: 修改文章,右侧预览页面代码高亮失效。需要刷新页面重新生效。
本章节是对cofess/hexo-theme-pure进行优化和修改的记录,并没有提交到仓库。
在cofess/hexo-theme-pure主题中,使用的是默认主题。由于博客背景色是#ffffff,代码块的背景色默认为#fafafa。造成代码块与博客普通文本区分度不高。monokai.css主题,但是直接引入这个主题与博客代码并不兼容,所以需要卸载默认的markdown引擎和安装CHENXCHEN/hexo-renderer-markdown-it-plus 。通过配置文件,为代码块的类名增加前置名称hljs。
1 2 npm un hexo-renderer-marked --save
在hexo根目录配置_config.yml,增加/修改内容:
1 2 3 4 5 6 7 8 9 10 11 12 13 14 15 markdown_it_plus: highlight: true html: true xhtmlOut: true breaks: true langPrefix: linkify: true typographer: quotes: “”‘’ pre_class: hljs plugins: - plugin: name: markdown-it-katex enable: true
通过Chrome DevTools查看到,页面code标签以及子类已经成功添加hljs,当页面由于还没有引入主题文件。
下载monokai.css 主题文件(其他主题可以到/themes/pure/source/css/themes/pure/source/css目录新增monokai-hook.css
1 2 3 4 5 6 7 8 9 10 11 12 13 14 15 16 17 18 19 20 @import url(monokai.css);.highlight , pre {overflow-y : hidden;background-color : #272822 ;line-height : 24px ;.highlight :before {background-color : #272822 ;.highlight table >tbody >tr :nth-of-type(odd) {background-color : #272822 ;
编辑/themes/pure/layout/_common/head.ejs,在53行附近的<%- css('css/style') %>下面新增引入monokai-hook文件的css。
1 2 <%- css ('css /theme /monokai-hook ') %>
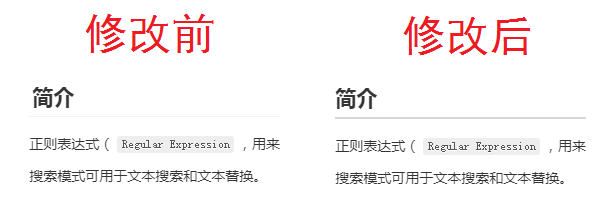
修改完成后的效果
1 2 3 4 5 6 7 8 9 10 11 12 13 14 15 16 17 18 19 20 21 22 23 24 25 26 27 28 29 30 31 32 33 34 35 .highlight ::-webkit-scrollbar {height : 8px ;.highlight ::-webkit-scrollbar-thumb {border-radius : 45px ;background-color : #6f6969 ;background-image : -webkit-linear-gradient (45deg ,255 , 255 , 255 , 0.2 ) 12.5% ,12.5% ,25% ,rgba (255 , 255 , 255 , 0.2 ) 25% ,rgba (255 , 255 , 255 , 0.2 ) 37.5% ,37.5% ,50% ,rgba (255 , 255 , 255 , 0.2 ) 50% ,rgba (255 , 255 , 255 , 0.2 ) 62.5% ,62.5% ,75% ,rgba (255 , 255 , 255 , 0.2 ) 75% ,rgba (255 , 255 , 255 , 0.2 ) 87.5% ,87.5% );.highlight ::-webkit-scrollbar-track {-webkit-box-shadow : inset 0 0 6px rgba (0 , 0 , 0 , 0.3 );border-radius : 10px ;background-color : #F5F5F5 ;
cofess/hexo-theme-pure代码块的默认字体是monospace,monospace,如果想修改为其他字体,需要对相关代码进行重写。/themes/pure/source/css/style.css,在最后增加以下代码即可。
cofess/hexo-theme-pure
1 2 3 4 5 6 7 8 9 10 11 .highlight .gutter pre {font-family : Inconsolata;.highlight .code code {font-family : Inconsolata;
##的样式cofess/hexo-theme-pure对h2的样式进行了修改,由于导致##和###区别不大,通过编辑/themes/pure/source/css/style.css,实现对##的样式的修改。
1 2 3 .marked-body h2 {border-bottom : 2px solid #d6d5d5 ;
cofess/hexo-theme-pure默认是没有对备案号进行处理的,所以需要在/themes/pure/layout/_partial/archive-list.ejs追加备案号。
1 2 3 4 5 <% if (theme.beian ) { %> <div class ="footer_copyright" > <span > <a href ='https://beian.miit.gov.cn' target ='_blank' > <%- theme.beian %> </a > </span > </div > <% } %>
然后编辑主题的css文件style.css
1 2 3 4 5 6 7 8 .footer_copyright {position : fixed;text-align : center;bottom : 10px ;width : 100% ;z-index : 999 ;left : 0 ;
参考文章:next主题添加代码块一键复制功能
1、增加全局函数addLoadEvent /themes/pure/source/js目录下打开application.js,在文件最后追加
1 2 3 4 5 6 7 8 9 10 11 function addLoadEvent (func ) var oldonload = window .onload;if (typeof window .onload != 'function' ) {window .onload = func;else {window .onload = function (
2、新增按钮:/themes/pure/layout/_partial目录下新增article-copy-code.ejs,增加以下内容:
1 2 3 4 5 6 7 8 9 10 11 12 13 14 15 16 17 18 19 20 21 22 23 24 25 26 27 28 29 30 31 32 33 34 35 36 37 38 39 40 41 42 43 44 45 46 47 48 49 50 51 52 53 54 55 56 57 58 59 60 61 62 63 64 65 66 67 68 69 70 71 72 73 74 75 <% if (theme.codeblock.copy_button.enable ){ %> <style > .copy-btn { color : #333 ; background-color : #eee ; background-image : linear-gradient (#fcfcfc , #eee ); border : 1px solid #d5d5d5 ; .highlight-wrap .copy-btn { transition : opacity .3s ease-in-out ; .highlight-wrap :hover .copy-btn , .highlight-wrap .copy-btn :focus { .highlight-wrap { </style > <script > addLoadEvent(() => $('.highlight' ).each(function (i, e ) var $wrap = $('<div>' ).addClass('highlight-wrap' ) $(e).after($wrap) $wrap.append($('<button>' ).addClass('copy-btn' ).append('<%= __("codeblock.copy_button") %>' ).on('click' , function (e ) var code = $(this ).parent().find(".code" )[0 ].innerText <% if (theme.codeblock.copyright.enable ){ %> code += "<%= theme.codeblock.copyright.content %>" <% } %> var ta = document .createElement('textarea' ) document .body.appendChild(ta) ta.style.position = 'absolute' ta.style.top = '0px' ta.style.left = '0px' var result = document .execCommand('copy' ) document .body.removeChild(ta) <% if (theme.codeblock.copy_button.result ){ %> if (result)$(this ).text('<%= __("codeblock.copy_success") %>' ) else $(this ).text('<%= __("codeblock.copy_failure") %>' ) <% } %> $(this ).blur() })).on('mouseleave' , function (e) var $b = $(this ).find('.copy-btn' ) setTimeout(function () $b.text('<%= __("codeblock.copy_button") %>' ) </script > <% } %>
3、插入到页面:/themes/pure/layout/layout.ejs,在</body>前面一行增加<%- partial('_partial/article-copy-code')%>
1 2 3 4 5 6 <%- body %>
坑:理论上可以在其他地方添加,但是必须保证代码在jq以及页面dom加载后运行。
4、增加语言文件: /themes/pure/languages目录下选择对应的语言文件,在文件后面增加:
1 2 3 4 codeblock: copy_button: 复制 copy_success: 复制成功 copy_failure: 复制失败
理论上只需添加当前语言文件即可,但是为了以后方便切换语音,建议所有语音文件都加上相应的配置。
5、增加主题配置文件themes/pure/_config.yml,在文件末尾添加
1 2 3 4 5 6 7 codeblock: copy_button: enable: true result: true copyright: enable: true content: \n/**\n* 感谢您复制代码,使用代码请注明引用出处\n* kajweb @ https://blog.iwwee.com\n*/
2020-10-20
功能:
1、leancloud创建Class备份文件 Log
2、创建云引擎
1 2 3 4 5 6 7 8 9 10 11 12 13 14 15 16 17 18 19 20 21 22 23 24 25 26 27 28 29 30 31 32 33 34 35 36 37 38 39 40 41 42 43 44 45 46 47 48 49 50 51 52 53 54 55 56 57 58 59 60 61 62 63 64 65 66 67 68 69 70 71 72 73 74 75 76 77 78 79 80 81 82 83 84 var AV = require ('leanengine' );'recorder' , async function (request ) let params = {return AV.Cloud.run('getCityByIp' , { ip : params.ip }).then(ipInfo =>return AV.Cloud.run('recorderSaveToDb' ,Object .assign( params, { ipInfo } )e =>return { id : e.getObjectId() };e =>console .log( e )return Promise .reject("track服务异常" );'getCityByIp' , async function (request ) let ip = request.params.ip || request.meta.remoteAddress;return AV.Cloud.run('getCityByIpFromTaobaoIp' , { ip })e =>'getCityByIpFromTaobaoIp' , async function (request ) let ip = request.params.ip || request.meta.remoteAddress;let accessKey = request.params.accessKey || "alibaba-inc" ;let baseUrl = "http://ip.taobao.com/service/getIpInfo.php" ;let url = `${baseUrl} ?ip=${ip} &accessKey=${accessKey} ` ;var request = require ('superagent' )return request.get( url ).then(res =>return res.body;e =>console .log("【淘宝】获得IP信息异常" );return Promise .reject("获得IP信息异常" );'recorderSaveToDb' , async function (request ) let ipInfo = request.params.ipInfo;delete request.params.ipInfo;var Loger = AV.Object.extend("Log" );var ipLoger = new Loger();return ipLoger.save()'trackUnload' , async function (request ) let id = request.params.id;var query = new AV.Query("Log" );return query.get(id).then(e =>let createdAt = e.getCreatedAt();let updatedAt = e.getUpdatedAt();let timer = e.get("timer" );if (timer) {let err = `该页面在${updatedAt} 已经被注销【${timer} 】` console .log(err);return Promise .reject(err);let calcTimer = (new Date () - new Date (createdAt)) / 1000 ;"timer" , calcTimer);return e.save();e =>return { timer : e.get("timer" )};e =>console .log(e)return Promise .reject("处理失败" );
3、修改主题配置文件/themes/pure目录,编辑_config.yml文件。在任意地方增加
1 2 3 4 5 loger: leancloud: enable: true app_id: xxxxxxxxxxxxxxxxxxxxxxxxx app_key: xxxxxxxxxxxxxxxxxxxxxxxx
4、创建loger.ejs /themes/pure/layout/_script目录,新建loger.ejs文件
1 2 3 4 5 6 7 8 9 10 11 12 13 14 15 16 17 18 19 20 21 22 23 24 25 26 27 28 29 30 31 32 33 34 35 36 37 38 39 40 41 42 43 44 45 46 47 48 49 50 51 52 53 54 55 56 57 58 59 60 61 <% if (theme.loger.leancloud.enable ){ %>"//cdn.jsdmirror.com/npm/leancloud-storage@1.2.1/dist/av-min.js" ></script> <script defer> if( !AV.applicationId || AV.applicationKey ){ AV.init({ appId: '<%= theme.pv.leancloud.app_id %>', appKey: '<%= theme.pv.leancloud.app_key %>', }); } function randomString(len) { len = len || 32; / ****默认去掉了容易混淆的字符oOLl,9 gq,Vv,Uu,I1****/ var $chars = 'ABCDEFGHJKMNPQRSTWXYZabcdefhijkmnprstwxyz2345678'; var maxPos = $chars.length; var pwd = ''; for (i = 0; i < len; i++) { pwd += $chars.charAt(Math.floor(Math.random() * maxPos)); } return pwd; } function trackUnload( tracker ){ return ()=>{ AV.Cloud.run( 'trackUnload', tracker ).then( tracked=>{ console.log( `[track] ${tracker.id} 结束访问 ${tracked.timer}s` ) }).catch(()=>{ console.log( "退出服务异常" ) }) } } $(function() { let blogTrack = sessionStorage.getItem( 'blogTrack' ); let blogTrackId = sessionStorage.getItem( 'blogTrackId' ); if( !blogTrack ){ blogTrack = 1; blogTrackId = randomString(); sessionStorage.setItem( 'blogTrackId', blogTrackId ); } else { blogTrack = parseInt(blogTrack) + 1; } sessionStorage.setItem( 'blogTrack', blogTrack ); let params = { host: window.location.host, url: window.location.pathname, title: document.title, referrer: document.referrer, blogTrack, blogTrackId } AV.Cloud.run( 'recorder', params ).then( tracker=>{ console.log( `[track] ${tracker.id} 开始访问` ) window.onbeforeunload = trackUnload(tracker); }).catch(()=>{ console.log( "track服务异常" ) }) }); </ script>
5、插入到全站代码
进入/themes/pure/layout/_common目录,编辑script.ejs文件,在后面增加
1 <%- partial ('_script /loger ') %>
1、在/themes/pure/layout/_common/script.ejs增加
1 <%- partial ('_script /go-top ') %>
2、在/themes/pure/layout/_script目录新增go-top.ejs。在文件里面新增以下内容:
1 <div id ="go-top" > </div > <style type ="text/css" > #go-top {width :40px ;height :36px ;background-color :plum;position :relative;border-radius :2px ;position :fixed;right :10px ;bottom :60px ;cursor :pointer;display :none} #go-top :after {content :" " ;position :absolute;left :14px ;top :14px ;border-top :2px solid #fff ;border-right :2px solid #fff ;width :12px ;height :12px ;transform :rotate (-45deg )}#go-top :hover {background-color :#8a2be2 }</style > <script > $(function (var o = $("#go-top" );$(window ).scroll(function (300 < $(window ).scrollTop() ? o.show(300 ) : o.hide(200 ), $("#go-top" ).click(function (return $("body,html" ).animate({ scrollTop : 0 }) }) }) }) </script >