背景
最近把服务器迁移到腾讯云,然后对nginx做了一些修改。现在弄个记录。
具体修改情况如下:
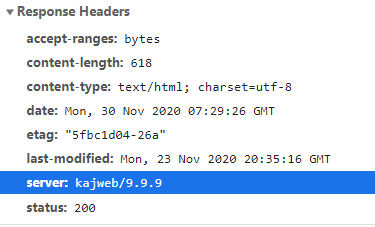
效果

操作
下载nginx源码
1
| wget http://nginx.org/download/nginx-1.16.0.tar.gz
|
解压nginx源码
1
| tar zxvf nginx-1.16.0.tar.gz
|
修改nginx服务器名称
使用vim打开src/core/nginx.h对其中的信息进行编辑
- nginx_version
- NGINX_VERSION
- NGINX_VER
- NGINX_VAR
修改后的代码如下:
1
2
3
4
5
6
7
8
9
10
11
12
13
14
15
16
17
18
19
20
21
22
23
24
25
26
|
#ifndef _NGINX_H_INCLUDED_
#define _NGINX_H_INCLUDED_
#define nginx_version 9999999
#define NGINX_VERSION "9.9.9"
#define NGINX_VER "kajweb/" NGINX_VERSION
#ifdef NGX_BUILD
#define NGINX_VER_BUILD NGINX_VER " (" NGX_BUILD ")"
#else
#define NGINX_VER_BUILD NGINX_VER
#endif
#define NGINX_VAR "kajweb"
#define NGX_OLDPID_EXT ".oldbin"
#endif
|
使用vim打开src/http/ngx_http_header_filter_module.c对其中的信息进行编辑。
主要修改内容为
1
2
3
| static u_char ngx_http_server_string[] = "Server: kajweb" CRLF;
static u_char ngx_http_server_full_string[] = "Server: kajweb" NGINX_VER CRLF;
static u_char ngx_http_server_build_string[] = "Server: kajweb" NGINX_VER_BUILD CRLF;
|
为了应对部分通用爬虫,然后对状态码进行修改,主要是对以下内容进行修改:
1
2
3
4
5
6
7
8
| static ngx_str_t ngx_http_status_lines[] = {
ngx_string("200 成功"),
ngx_string("201 创建"),
ngx_string("202 接受"),
ngx_null_string,
ngx_string("204 没有内容"),
ngx_null_string,
ngx_string("206 Partial Content"),
|
修改错误提示内容
使用vim打开src/http/ngx_http_special_response.c对其中的信息进行编辑。
对其中的变量进行修改:
1
2
3
4
5
6
7
8
9
10
11
12
13
14
15
16
17
18
19
20
21
22
23
24
25
26
27
28
29
30
31
| static u_char ngx_http_error_tail[] =
"<hr><center>kajweb-error-tail</center>" CRLF
"</body>" CRLF
"</html>" CRLF
;
static u_char ngx_http_msie_padding[] =
"<!-- 一个填充禁用MSIE和Chrome友好的错误页 -->" CRLF
"<!-- 一个填充禁用MSIE和Chrome友好的错误页 -->" CRLF
"<!-- 一个填充禁用MSIE和Chrome友好的错误页 -->" CRLF
"<!-- 一个填充禁用MSIE和Chrome友好的错误页 -->" CRLF
"<!-- 一个填充禁用MSIE和Chrome友好的错误页 -->" CRLF
"<!-- 一个填充禁用MSIE和Chrome友好的错误页 -->" CRLF
;
static u_char ngx_http_msie_refresh_head[] =
"<html><head><meta http-equiv=\"Refresh\" content=\"0; URL=";
static u_char ngx_http_msie_refresh_tail[] =
"\"></head><body></body></html>" CRLF;
static char ngx_http_error_301_page[] =
"<html>" CRLF
"<head><title>三零一</title></head>" CRLF
"<body>" CRLF
"<center><h1>三零一</h1></center>" CRLF
;
|
修改HTTP2的响应
使用vim打开src/http/v2/ngx_http_v2_filter_module.c对其中的信息进行编辑。
搜索一下内容,并将相应的内容修改即可。
1
2
| ngx_log_debug0(NGX_LOG_DEBUG_HTTP, fc->log, 0,
"http2 output header: \"server: nginx\"");
|
对ngin重新编译
1
2
3
4
5
6
7
8
9
| ./configure \
--with-cc-opt=-O2 \
--with-http_realip_module \
--with-http_v2_module \
--with-http_stub_status_module \
--with-http_ssl_module \
--with-http_gzip_static_module \
make && make install
|
软连接
编译后,nginx没有加入系统变量,所以需要将nginx软连接到/usr/local/sbin。这样才能直接在命令行中执行nginx的相关命令。
同时,鉴于yum默认将nginx下载到/ect/nginx目录,所以为了兼容部分习惯,所以将nginx的安装目录软连接到/ect/nginx
1
2
| ln -s /usr/local/nginx /etc/nginx
ln -s /etc/nginx/sbin/nginx /usr/local/sbin
|
总结
修改nginx的服务器名称,首先是为了安全的考虑。互联网的环境下,会存在大量的爬虫脚本,当检测到nginx以及版本号时,如果存在0 Day将快速攻破。
隐藏服务器名称以及修改版本号,减少自动化攻击脚本的攻击概率。
【参考文章】
将Nginx服务器名称修改为任意名字
welcome to https://iwwee.com